DIY garden figurines for the site - my ideas in the photo
Contents ✓
IDEAS FOR MAKING FIGURINES FOR THE GARDEN
The land under the white wings - this is how Belarus is often called. The stork is probably the most common bird in our open spaces. We all look forward to their return in the spring and everyone wants this bird to build its nest near his house.
Well, if there aren’t enough real storks for everyone, you can put a man-made copy of it on your site. For example, Olga Yasonova from Zvonets has already built a nest for this proud bird.
I installed it in a basin on a small stump, put a stone “egg” inside, and cut out a stork figurine from plywood (photo 1).
To complete the composition, I made a dry pond with a couple of swans, also made of stone and a plastic pipe (photo 2). Residents of the village of Ilyich also did not ignore the storks.
They got a whole clearing with several families (photo 3), a flower bed of painted stones and plants looks especially original (photo 4). Plastic bottles are another grateful material for creativity.
A ladybug made of plastic bottoms looks like a bright flower from afar (photo 5). Not far away, an old grandmother sat down by the wattle fence and watched her goat-nurse (photo 6).
And then there is a flower bed of an old cart and boxes. The main thing here is to color it brighter and plant lush petunias in the resulting pots (photo 7)
Resourceful villagers found a use even for old stumps and cut down trees (photo 8, 9, 10) Well, so that the kids would not get bored, they immediately made a wooden rocking chair with holders in the form of ducks (photo 11). And of course, there were some old tires and galoshes that turned into the Frog Princess (photo 12)
This is such a useful trip we got on a business trip. Be inspired, dear friends, bring your plans to life and share with us!


GARDEN FIGURES WITH YOUR HANDS - OPTIONS AND IDEAS FROM READERS
GARDEN SCULPTURES WITH OWN HANDS - HOW WE MADE THEM FOR SCHOOL
Each of us, if desired and diligent, can ennoble the site with plaster or concrete sculptures. Similar ones adorn the territory of the school (photo 1 - 3) where I work. I was inspired by these ideas and decided to study manufacturing technology. here's what I found out.
FIGURES FROM CEMENT OWN HANDS
First of all, read the instructions. It is necessary to dilute the cement with water and add sand exactly as it prescribes.
The solution for work should not be too liquid and not too thick.
For the simplest shapes (balls, hedgehogs, fungi, etc.), you can use the appropriately shaped materials at hand. For example, to make a hat for a mushroom, especially with an imitation of texture, you need to dig a semicircular depression in the ground and lay it out with the leaves of large plants. Pour the solution into the "form" and leave for 3-4 days. From the resulting blank, you can make a hedgehog, a hat of a fungus and paint it with paint for outdoor work.

Do not forget that the paint should be updated at least once a year, and each time, taking into account your taste and imagination, you can give the hemisphere a new life (for example, there was a hedgehog, but turned into a ladybug).
If you want to have a hollow cement figure, you need to create a wire frame and wrap it with construction mesh. The cement mortar should not be thick and not liquid. In this way, you can make, for example, figures of people and animals. After complete drying, the product can be painted to your taste.
Also, the figure on the wire frame can be cast, in which case the building mesh does not need to be used.
In order for the cement figure to be more resistant to destruction, and the material itself to be more plastic during work, a little PVA glue must be added to the solution for frost resistance and washing powder or dishwashing detergent for plasticity.
GARDEN FIGURES FROM GYPSUM OWN HANDS
Plaster sculptures are made if you need to get more intricate works of art with fine details (for example, various fairy-tale characters).
Gypsum dries within a day and is best at a temperature of 15 degrees, the solution is also prepared according to the instructions.
Plaster figures are made in three stages: general outlines, then smaller details that can be glued to the figure, and finally the smallest details.
The sculpture can also be painted after it has completely dried with exterior or interior paint (depending on where it will stand).
You can make figures that have practical applications in landscape design. For example, the sculpture of a bear with a barrel (photo 4) is a stand for a flower pot.
© Author: Svetlana Semina, teacher of the State Educational Institution "Secondary School No. 10" Photo by the author
BABA YAGA IN THE STUPA WITH OWN HANDS TO PROTECT THE COTTAGE)

I made a lot of fairy-tale characters and now the turn has come to Baba Yaga.
I bought 1,5 m of a metal mesh with cells of 20 × 20 mm. I cut off 1 m, twisted it into a cylinder with a diameter of 30 cm and a height of 80 cm, fastened the edges with a thin wire - this will be a mortar.
From the rest of the grid, I cut out a circle with a diameter of 33 cm and also attached it to the cylinder with wire, retreating from the edge by 1,5 cm.
I prepared a cement mortar by mixing cement with sand (for 1 part of cement - 2 parts of sand). I mixed everything thoroughly and added water so that the mixture was thick. Then you get a good grip with the grid.
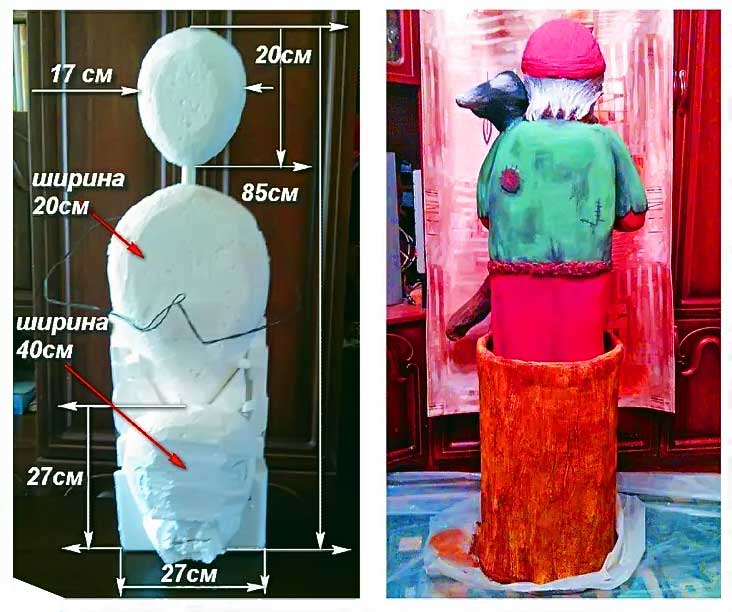
Part of the solution was laid out on a cellophane film along the bottom diameter of at least 2 cm thick. I put a mesh cylinder on this circle and pressed it a little into the solution so that the mesh was not visible. Then, with both hands (it is better to do this with rubber gloves), she thickly applied cement mortar to the sides of the stupa and immediately gave it the shape of a tree bark. The thickness should also be at least 2 cm. After that, I waited one day. In the meantime, I made a blank of Baba Yaga (the dimensions are shown in the figure). You can use foam or foam-noplex. The support is a metal-plastic pipe (the diameter can be any), to which I glued all parts of the figure with hot glue. Its width should be 3-4 cm less than the diameter of the mortar. Inside, where the shoulders will be, I inserted a double-twisted wire with a diameter of 2 mm. The length of one arm is about 80 cm.
I cut pieces of foam 5 cm in diameter and strung them on the future hands of Baba Yaga, leaving 10 cm to the edge and bending them so that you can insert a broom.
I prepared a cement mortar - diluted 2 parts of sand and 1 part of cement with water to the consistency of liquid sour cream and added a little PVA glue for better adhesion to the surface. She cut off strips of fabric (you can use any material, but not silk or synthetics), dipped them in the solution and wrapped them around the foam figure. The bottom should be covered with cement sheets.
For the crow, I inserted two pieces of wire into the shoulder, and cut the crow itself out of polystyrene foam and, wrapping it with a cloth, strung it on this wire.
The broom was made from a metal-plastic pipe, its length is 70 cm. To do this, I inserted the pipe into the neck of a 0,5-liter plastic bottle, tightly fastened it with adhesive tape, wrapped the entire structure with a cloth soaked in a liquid cement mortar, and immediately inserted it into the wire palms, tightly wrapping them around the broomstick.
Then she continued to work with the stupa. Inside the stupa, I tightly stuffed plastic bottles, foam plastic scraps, expanded clay, the remains of a liquid cement solution, leaving 5 cm to the edge. The remains of the grid were laid out to the very top and filled with a thick cement mortar, not reaching the top 3 cm.
Then she returned to Baba Yaga. I moistened all surfaces with a primer and sculpted a sculpture with a thick cement mortar, not forgetting to form hands, a broom and a crow.
When all the blanks were dry, I started assembling the entire structure: I laid out a thick mortar in a mortar and immediately put the sculpture on it.
It remains only to grind with sandpaper, cover with a deep penetration primer, paint with facade paint - and that's it. If desired, you can varnish Baba Yaga.
© Author: Galina Kotova, Kaluga region. Author's photo
GARDEN FLAMINGO AND COMPANY

It's no secret that each of us would like to be able not only to work in our own garden, but also to relax our souls - when every corner of the eye pleases. What our readers do not decorate their yards and plots with. After all, garden crafts are a great opportunity to diversify the decor of the backyard territory and create a beautiful space that will not only please the eye, but also perform certain functions. For example, original figurines can be made from concrete, which are used as decorations, as well as flower vases and flower beds of various sizes and shapes. Styrofoam also becomes a source of inspiration for many authors - light, easy to use and quite durable material. Today we have prepared for you some ideas for decorating the site. they are really easy to perform and will not hit the wallet.
Somehow I came across a beautiful picture of a flamingo - I really wanted to “settle” this wonderful bird in my garden. I asked my brother to help with the implementation of the idea.

Brother manually enlarged the picture to scale, transferred it to a large piece of wallpaper. Cut out the template. According to this template, I sawed out a frame of a bird from plywood. I made legs from a thin metal pipe. To fix them on the body of the bird, the upper end was sawn into two parts, flattened them, drilled holes and screwed the legs to the plywood using self-tapping screws. From the bottom I made two cuts at the end. He bent and flattened the ends of the pipe. I screwed the resulting “legs” with screws to the base (wooden board) (photo 1).
Since the finished figure turned out to be flat, it was necessary to give it volume. From thick foam, I cut out two identical blanks of the torso with a clerical knife (I used the same template as for the frame). On the one side that will be adjacent to the plywood, I left them flat, and on the outside I cut off the excess foam, giving the torso a shape, forming the wings. I glued the halves on liquid nails on both sides to plywood. After that, she completely pasted over the bird figurine with gauze dipped in a plaster solution. I carefully smoothed the fabric to indicate all the reliefs.
After drying, the workpiece was coated with cement mortar. Also marked all the necessary reliefs. After the solution dried, I sanded the bumps a little. I painted the bird with acrylic paint (photo 2) Gradually, in the company of flamingos, I made storks, a cockerel and other birds (photo 3-5)
© Author: Lilia Goncharonok Photo by Irina Savosina
Reference by topic: Garden figurines from cement mortar with my own hands - my ideas
GARDEN FIGURES WITH YOUR HANDS - IDEAS FOR THE GARDEN ON VIDEO


© Author: Natalia Aristova. Photo by Irina Savosina
TOOLS FOR MASTERS AND MASTERS, AND HOME GOODS ARE VERY CHEAP. FREE SHIPPING. THERE ARE REVIEWS..
Below other entries on the topic "How to make your own hands - a householder!"
- Chinese style garden - what it consists of and how to create
- Placing water features in the garden
- Flower bed for people with allergies to flowering - what to plant and scheme
- Tree shrubs instead of a flower garden: a beautiful garden with your own hands
- DIY flower bed-trellis made of wood + drawing
- Do-it-yourself dacha and house in Russian style
- Do-it-yourself decorative mini-bridge on the site
- Autumn flower garden with dahlias - scheme and plan of planting
- DIY garden arch made of reinforcement WITHOUT WELDING + drawing
- Openwork silvery flower garden with own hands - photo
Subscribe to updates in our groups and share.
Let's be friends!